


USB 3.0 Now Introduced


One of the announcements to come out of the IDF keynote this afternoon was Pat Gelsinger's discussion and demonstration of USB 3.0 technology. Although still in the prototype stage, USB 3.0 is aiming for 10 times the bandwidth of current USB2.0 solutions,or approximately 5Gbps. Since this requires fiber optic cabling, USB 3.0 will add a length of optical data cable to the mix, though USB 3.0 will retain full compatibility with USB 2.0 (and, one assumes, USB 1.0 as well).
Gelsinger expects the final version specifications to be finished by the first half of 2008,
with USB 3.0 peripherals realistically appearing in 2009 or 2010. There are an increasing number of devices that could potentially take advantage of the additional bandwidth, including external hard drives,flash readers, video cameras, and the all-new USB-compliant llama expected to be genetically delivered from the Andes sometime in late 2011. Obviously a USB llama wouldn't be much use without a USB 3.0 device-ever tried downloading from a llama over an old 10BaseT network? Yeah. It'd be worse.
As for the other, official features of USB 3.0, there remains quite a bit of information we don't know, and it would have been nice for Intel to have included additional information. USB has long been criticized for relatively high CPU usage. This has inevitably become
less of an issue as CPU performance has improved, but devices capable of using USB 3.0's higher bandwidth capabilities could make CPU usage a problem again unless the issue is addressed during spec development. Issues like cable length, available power provided, and the number of devices per channel are all unrevealed as yet, and possibly unresolved. The Inquirer has a few more details on the spec (and the rest of the keynote) if you're interested.
As far as future market competition, its target of 5Gbps puts USB 3.0 ahead of current eSATA (3Gbps), which is really the only other device protocol under active development that might challenge it as a peripheral interconnect. Although an IEEE 1394c protocol has been developed and published as of June 8 2007, no company has announced an intent to produce a product or chipset that utilizes the standard.FireWire remains supported in certain sectors, but I'd personally be surprised if the combination of USB 3.0 and eSATA doesn't push FireWire out of the market completely. As for the nascent specification, the proposed 5Gbps speed is great and all, but hopefully the development committees will acknowledge some of the other concerns regarding the USB 2.0 protocol and incorporate solutions for them, rather than carrying them over into another product generation.
windows server 2008 working with Special Boot Mode.PART-III
Performing a Memory Test
Modern computers contain a significant amount of memory, and it isn’t easy to know whether the memory is usable. Because of the way that Windows manages memory, it’s impossible to test memory correctly in Windows. A few products on the market try, but the results are probably inaccurate or memory isn’t fully tested. Windows Server 2008 comes with a new memory testing diagnostic that you can access from one of three locations:
✦ The Control Panel
✦ The boot menu
✦ The CD diagnostics
The diagnostic behaves about the same no matter where you access it. To access the memory diagnostic from within Windows, open the Control Panel and double-click the Memory Diagnostics Tool entry within the Administrative Tools folder. To start the diagnostic at the boot menu, press Tab, select the Windows Memory Diagnostic option from the Tools menu, and press OK. When you start the Windows Memory Diagnostics tool from the CD or from within Windows, it displays a dialog box where you choose between performing the test immediately or waiting until the next time you boot the machine.
Performing the test immediately is the preferred option when you suspect that your system is having memory problems. Starting the Windows Memory Diagnostic tool from the boot menu begins the test immediately. If you’re starting this test from the CD, don’t boot from the CD when you want to run the test. The test starts when you attempt to boot from the hard drive. Of course, this means you have to have a bootable partition on the hard drive and that this isn’t one of the diagnostics you can run exclusively from the CD.
All you can do is start the test from the CD when you can’t start it for whatever reason by using the boot menu or directly from Windows. When the test begins, you see a Windows Memory Diagnostic Tool screen. Windows isn’t booted at this point, so you can’t do anything with the machine. You can use the default settings for most situations. However, if you want a faster or more comprehensive test, press F1 to enter the Windows Memory Diagnostics Tool – Options window, where you can set any of these options:
✦ Test Mix: Determine the tests that Windows runs on memory. Extended tests can help you locate even subtle memory problems, but they require a significant amount of time. Basic tests are good for a very quick check when you want to verify system health.
✦ Cache: Enable or disable the memory cache. The default setting uses the configuration found in the BIOS settings for your machine. In general, you want to use the Default setting unless you have a reason to suspect that the cache is damaged.
✦ Pass Count: Define the number of times that the test runs. The default setting of 2 finds most problems. You can miss intermittent problems by using a value of 1. The settings let you run the tests up to 99 times, which is probably overkill.
Configure the settings you want to use and then press F10. The Windows Memory Diagnostic Tool screen displays the test progress for you. When the test completes, your machine boots as normal. If you started the test from the boot menu or within Windows, you see in the notification area a status message from the Windows Memory Diagnostic tool. Click the associated Notification Area icon to remove the message. If you start the test using the CD, you don’t see the status message when you boot Windows — you need to watch the test as it runs.
Performing a Windows Complete PC Restore
At some point, your server will experience some type of major hard drive failure and won’t boot. Yes, you can keep track of the event log, configure the hard drive’s Self-Monitoring, Analysis, and Reporting Technology (SMART) capability in the BIOS configuration, and run your own diagnostics, but sometimes the hard drive will fail even with all this vigilance in place.
In addition, bad configurations, viruses, adware, and other issues can force you to perform a complete restore of your hard drive to get the system back into a usable state. Of course, all these issues point to the need for a good backup Assuming that you have a good backup, you can restore it using either the standard approach or the Windows Complete PC Restore option of the System Recovery Options dialog box, shown below Figure . Starting the restoration by using the CD ensures that any virus, adware, or other type of nefarious software isn’t running when you begin the restore, which tends to ensure that the restoration process will succeed as expected. In addition, you must use the CD approach when the hard drive fails completely.

Using the Command Prompt
Boot CD: You can use the boot CD to open a command prompt that doesn’t have any access to any operating system resources but can perform tasks without any operating system interference. This option is the best one to use for low-level tasks. For example, you use this option to replace operating system files or repartition the disk. However, this option may not be available when the hard drive relies on BitLocker encryption. Yes, you can still open the command prompt, but the BitLocker encryption prevents you from performing any useful tasks.
✦ Boot menu: Using the boot menu option provides a command prompt that includes some operating system functionality but none of the normal drivers. The system has booted into Safe Mode. All the normal paths are in place, but you may notice that some devices are unavailable. Use this option when you need to perform diagnostics with command line utilities. For example, you can verify that the system has specific services running. You can start or stop services to observe their effect on the system and determine whether a particular service is causing the system to fail.
✦ Within Windows Server 2008: When you open a command prompt from within Windows Server 2008, you normally have full access to the system features. In addition, you can work with all the normal drivers loaded and services running. Use this option when you want to perform configuration or other maintenance tasks at the command line. Be aware, however,that the operating system may actually hide some system features from view.
windows server 2008 working with Special Boot Mode.PART-II
Using debugging mode
Debugging mode is an option where Windows boots a special version of itself called the kernel debugger. A developer can use this mode to troubleshoot errant code either locally (when the system is generally working) or from a remote location. Unlike Remote Desktop or other methods of connecting remotely, debugging mode requires a serial connection, normally using COM2. Disabling the automatic restart on system failure Windows is set up to restart automatically during a major system failure. This behavior makes it possible to recover from a major failure without having to perform a hard boot (essentially pulling the plug or pressing the Reset button on the front of the system), which can cause damage to your hard drive. There are two problems with this feature:
✦ Windows can reboot before you can record all the information you need about the major failure.
✦ Some viruses rely on the reboot feature and can actually prevent you from using the server by causing the server to constantly crash
Disabling driver signature enforcement
Many of the virus, adware, security, and crash problems with Windows occur when someone installs a driver of dubious origin. The driver supposedly provides some special feature for Windows but in reality makes Windows unstable and can open doors for people of ill intent who want your system for themselves. Of course, Microsoft’s solution is to lock down Windows so that you can use only signed drivers. A signed driver is one in which the driver creator uses a special digital signature to “sign” the driver software. You can examine this signature (as can Windows) to ensure that the driver is legitimate.
Windows 2008 doesn’t load a driver that the vendor hasn’t signed. Unfortunately, you’ll find more unsigned than signed drivers on the market right now. Vendors haven’t signed their drivers, for the most part, because the process is incredibly expensive and difficult. Many vendors see the new Windows 2008 feature as Microsoft’s method of forcing them to spend money on something that they dispute as having value.
Theoretically, someone can forge a signature, which means that the signing process isn’t foolproof and may not actually make Windows more secure or reliable. Of course, the market will eventually decide whether Microsoft or the vendors are correct, but for now you have to worry about having signed drivers to use with Windows.
Using the boot method of permanently disabling signed driver checking An undocumented method of disabling the signed driver requirement for both 32-bit and 64-bit versions of Windows Server 2008 is to use the BCDEdit utility to make a change to the boot configuration. Because this feature isn’t documented, Microsoft could remove it at any time. This procedure isn’t something that a novice administrator should attempt to do, but it’s doable. The following steps describe the process:
1. Choose Start➪Programs➪Accessories. You see the Accessories menu.
2. Right-click Command Prompt and choose Run As Administrator from the context menu.
Windows opens a command line with elevated privileges. You can tell that the privileges are elevated because the title bar states that this is the administrator’s command prompt rather than a standard command prompt.
3. Type BCDEdit /Export C:\BCDBackup and press Enter.
BCDEdit displays the message This Operation Completed Successfully. This command saves a copy of your current boot configuration to the C:\BCDBackup file. Never change the boot configuration without making a backup.
4. Type BCDEdit /Set LoadOptions DDISABLE_INTEGRITY_CHECKS and press Enter.
BCDEdit displays the message This Operation Completed Successfully. Your command prompt should now look like the one shown in this fig.

5. Restart your system as normal to use the new configuration.
Using the group policy method of permanently disabling signed driver checking Users of the 32-bit version of Windows Server 2008 also have a documented and Microsoft-approved method of bypassing the signing requirement. (This technique will never work on the 64-bit version of the product.) In this case,you set a global policy that disables the requirement for the local machine (when made on the local machine) or the domain (when made on the domain controller). The following steps describe how to use the Global Policy Edit (GPEdit) console to perform this task.
1. Choose Start➪Run.
You see the Run dialog box.
2. Type GPEdit.MSC (for Group Policy Edit) in the Open field and click OK.
Windows displays the Local Group Policy Editor window.
3. Locate the Local Computer Policy\User Configuration\ Administrative Templates\System\Driver Installation folder.
4. Double-click the Code Signing for Device Drivers policy.
You see the Code Signing for Device Drivers Properties dialog box,shown below.....


5. Select Enabled.
6. Choose Ignore (installs unsigned drivers without asking), Warn (displays a message asking whether you want to install the unsigned driver), or Block (disallows unsigned driver installation automatically) from the drop-down list.
7. Click OK.
The Local Group Policy Editor console sets the new policy for installing device drivers.
8. Close the Local Group Policy Editor console.
9. Reboot the server.
Theoretically, the changes you made should take effect immediately after you log back in to the system. However, to make sure the policy takes effect for everyone, reboot the server.
windows server 2008 working with Special Boot Mode.PART-I
Using a Special Boot Mode
Working with the Safe Mode options Safe Mode is one of the oldest diagnostic features of Windows, and it’s still one that you find used quite often to locate problems. The idea behind Safe Mode is that the operating system boots with the minimal number of features in place that are necessary for the operating system to work.
Using standard Safe Mode
Standard Safe Mode is the most restrictive form: None of the non-essential device drivers, services, or applications load. In fact, you can’t even access the network. Your system becomes a standalone machine that really can’t do much except recover from whatever problem has affected it. you can use this mode for the following tasks:
✦ Restore a backup.
✦ Perform a backup.
✦ Modify the registry.
✦ Uninstall an errant application, device driver, or service.
✦ Perform GUI-based diagnostics.
Using Safe Mode with Networking
The Safe Mode with Networking option performs the normal Safe Mode setup and then adds any drivers, services, and applications required to create a network connection. The resulting network connection lets you access other machines. Windows also restores any device mappings for your system so that you have access to hard drives on other systems.
You can use this mode for the following tasks:
✦ Install an application, device driver, or service update using a file on a server.
✦ Connect to another machine to compare its setup with the local setup.
✦ Use a shared Internet connection to obtain updates online.
✦ Use a shared Internet connection to search for troubleshooting help,leave help messages on newsgroups, and search vendor Web sites for additional information.
✦ Troubleshoot a network connectivity problem in an environment free of other software.
✦ Make the troubled system available for collaborative troubleshooting.
Using Safe Mode with Command Prompt
The Safe Mode with Command Prompt option starts the system in Safe Mode but doesn’t start the graphical user interface (GUI). What you see instead is a command prompt where you can run utilities to determine the system status. You may not think that the command prompt has much to offer, but you can perform nearly any configuration task at the command prompt without GUI interference. In fact, Windows Server 2008 includes a new utility named Server Manager Cmd that makes it considerably easier to configure your server from the command prompt you can use this mode for the following tasks:
✦ Verify that the graphical components aren’t causing a system failure.
✦ Perform configuration tasks outside the GUI to determine whether the GUI is keeping them from completing normally.
✦ Use batch files or other character-based tools to troubleshoot your system faster than you can when using the GUI (this mode provides a significant performance boost).
The Safe Mode with Command Prompt option doesn’t start most of the GUI features that you may have used in the past. You can’t even use a mouse. Consequently, make sure you know how to perform tasks using just the keyboard. In addition, you don’t have access to the Start menu. If you start in this mode, you need to type Shutdown /s and press Enter. This command shuts off the system completely.
If you decide that you want to restart the computer instead, type Shutdown /r and press Enter.When working at the command prompt, use the pipe symbol (|) followed by the More command to display long screens of Help information. For example, if you want to see all the help information for the Shutdown command, you type Shutdown /? | More and press Enter. Windows displays the Help information one screen at a time.
Using the last known good configuration
Many errors occur due to a configuration change. For example, you might install a new device driver and find that the system suddenly doesn’t boot because of it. A new application can cause the system to fail as well. Any change that affects the boot sequence can cause problems that seem impossible to fix. The Last Known Good Configuration (Advanced) option lets you use the configuration from the last time that Windows booted successfully without using any of the special options. Think of it as an undo feature — you can reverse the effects of a single bad decision, configuration change, or installation.
Using Directory Services Restore mode
Active Directory is a special kind of hierarchical database that stores system settings, computer information, user information, application configuration, and a wealth of other information and statistics about your network. When this database becomes corrupted, it can prevent your server from booting because Windows can’t find the settingsit needs. Choosing the Directory Services Restore Mode option tells Windows to attempt to fix Active Directory — at least enough to let you boot the server. After you boot the server, you can restore any backup you have to fix the Problem completely.
You find Active Directory used only on domain controllers If your server isn’t a domain controller, it doesn’t have Active Directory installed and you should never use this option with it. When you use the Directory Services Restore Mode option, Windows performs the following tasks:
1. The server begins booting as if you had selected a Safe Mode option.
2. The server then performs a check of the hard drives on your system.This check looks for any problems with the hard drive that could have caused the Active Directory corruption (using the ChkDsk utility).
3. After a few more configuration tasks take place, you see a normal login screen. Supply your credentials and you see a Safe Mode screen — not the normal GUI.
4. Use any Active Directory GUI or command line tool to make repairs to Active Directory. You can also restore any backup you made (assuming the backup is available in Safe Mode).
5. After you finish the repairs, type Shutdown /r and press Enter at the command prompt or choose Start➪Shutdown.
6. When you’re working at the command line, Windows displays a You Are About to be Logged Off dialog box. After about a minute, the server reboots. When working with the GUI shutdown, you see the normal Shut Down Windows dialog box, where you can choose any of the standard
shutdown options. You can use Windows Server 2008 in its normal mode at this point and continue any repairs you need to make to Active Directory.
Keyboard shortcuts for Windows
Keyboard shortcuts to know
Windows system key combinations
F1: Help
CTRL+ESC: Open Start menu
ALT+TAB: Switch between open programs
ALT+F4: Quit program
SHIFT+DELETE: Delete item permanently
Windows program key combinations
CTRL+C: Copy
CTRL+X: Cut
CTRL+V: Paste
CTRL+Z: Undo
CTRL+B: Bold
CTRL+U: Underline
CTRL+I: Italic
Mouse click/keyboard modifier combinations for shell objects
SHIFT+right click: Displays a shortcut menu containing alternative commands
SHIFT+double click: Runs the alternate default command (the second item on the menu)
ALT+double click: Displays properties
SHIFT+DELETE: Deletes an item immediately without placing it in the Recycle Bin
General keyboard-only commands
F1: Starts Windows Help
F10: Activates menu bar options
SHIFT+F10 Opens a shortcut menu for the selected item (this is the same as right-clicking an object
CTRL+ESC: Opens the Start menu (use the ARROW keys to select an item)
CTRL+ESC or ESC: Selects the Start button (press TAB to select the taskbar, or press SHIFT+F10 for a context menu)
ALT+DOWN ARROW: Opens a drop-down list box
ALT+TAB: Switch to another running program (hold down the ALT key and then press the TAB key to view the task-switching window)
SHIFT: Press and hold down the SHIFT key while you insert a CD-ROM to bypass the automatic-run feature
ALT+SPACE: Displays the main window's System menu (from the System menu, you can restore, move, resize, minimize, maximize, or close the window)
ALT+- (ALT+hyphen): Displays the Multiple Document Interface (MDI) child window's System menu (from the MDI child window's System menu, you can restore, move, resize, minimize, maximize, or close the child window)
CTRL+TAB: Switch to the next child window of a Multiple Document Interface (MDI) program
ALT+underlined letter in menu: Opens the menu
ALT+F4: Closes the current window
CTRL+F4: Closes the current Multiple Document Interface (MDI) window
ALT+F6: Switch between multiple windows in the same program (for example, when the Notepad Find dialog box is displayed, ALT+F6 switches between the Find dialog box and the main Notepad window)
Shell objects and general folder/Windows Explorer shortcuts
For a selected object:
F2: Rename object
F3: Find all files
CTRL+X: Cut
CTRL+C: Copy
CTRL+V: Paste
SHIFT+DELETE: Delete selection immediately, without moving the item to the Recycle Bin
ALT+ENTER: Open the properties for the selected object
To copy a file
Press and hold down the CTRL key while you drag the file to another folder.
To create a shortcut
Press and hold down CTRL+SHIFT while you drag a file to the desktop or a folder.
General folder/shortcut control
F4: Selects the Go To A Different Folder box and moves down the entries in the box (if the toolbar is active in Windows Explorer)
F5: Refreshes the current window.
F6: Moves among panes in Windows Explorer
CTRL+G: Opens the Go To Folder tool (in Windows 95 Windows Explorer only)
CTRL+Z: Undo the last command
CTRL+A: Select all the items in the current window
BACKSPACE: Switch to the parent folder
SHIFT+click+Close button: For folders, close the current folder plus all parent folders
Windows Explorer tree control
Numeric Keypad *: Expands everything under the current selection
Numeric Keypad +: Expands the current selection
Numeric Keypad -: Collapses the current selection.
RIGHT ARROW: Expands the current selection if it is not expanded, otherwise goes to the first child
LEFT ARROW: Collapses the current selection if it is expanded, otherwise goes to the parent
Properties control
CTRL+TAB/CTRL+SHIFT+TAB: Move through the property tabs
Accessibility shortcuts
Press SHIFT five times: Toggles StickyKeys on and off
Press down and hold the right SHIFT key for eight seconds: Toggles FilterKeys on and off
Press down and hold the NUM LOCK key for five seconds: Toggles ToggleKeys on and off
Left ALT+left SHIFT+NUM LOCK: Toggles MouseKeys on and off
Left ALT+left SHIFT+PRINT SCREEN: Toggles high contrast on and off
Microsoft Natural Keyboard keys
Windows Logo: Start menu
Windows Logo+R: Run dialog box
Windows Logo+M: Minimize all
SHIFT+Windows Logo+M: Undo minimize all
Windows Logo+F1: Help
Windows Logo+E: Windows Explorer
Windows Logo+F: Find files or folders
Windows Logo+D: Minimizes all open windows and displays the desktop
CTRL+Windows Logo+F: Find computer
CTRL+Windows Logo+TAB: Moves focus from Start, to the Quick Launch toolbar, to the system tray (use RIGHT ARROW or LEFT ARROW to move focus to items on the Quick Launch toolbar and the system tray)
Windows Logo+TAB: Cycle through taskbar buttons
Windows Logo+Break: System Properties dialog box
Application key: Displays a shortcut menu for the selected item
Microsoft Natural Keyboard with IntelliType software installed
Windows Logo+L: Log off Windows
Windows Logo+P: Starts Print Manager
Windows Logo+C: Opens Control Panel
Windows Logo+V: Starts Clipboard
Windows Logo+K: Opens Keyboard Properties dialog box
Windows Logo+I: Opens Mouse Properties dialog box
Windows Logo+A: Starts Accessibility Options (if installed)
Windows Logo+SPACEBAR: Displays the list of Microsoft IntelliType shortcut keys
Windows Logo+S: Toggles CAPS LOCK on and off
Dialog box keyboard commands
TAB: Move to the next control in the dialog box
SHIFT+TAB: Move to the previous control in the dialog box
SPACEBAR: If the current control is a button, this clicks the button. If the current control is a check box, this toggles the check box. If the current control is an option, this selects the option.
ENTER: Equivalent to clicking the selected button (the button with the outline)
ESC: Equivalent to clicking the Cancel button
ALT+underlined letter in dialog box item: Move to the corresponding item
About when your mouse fails Many debugging modes can cause your mouse to fail. The mouse cursor appears as normal,but moving the mouse no longer moves the cursor. You can always try rebooting your system and entering debugging mode again, but sometimes this technique doesn’t work. When you can’t get the mouse to work, you need to use the keyboard exclusively. Of course, most people know that you can move from field to field in an application by pressing the Tab key.
Pressing Alt+Menu Letter accesses menu options in an application. Move between applications by pressing Alt+Tab. Move between options on the Taskbar using a combination of the Tab key (to move between major areas) and the arrow keys. Clear or check an option by pressing the spacebar. If you need to display a list of options in a list box or combo box, press Alt+Down Arrow, select the option you want, and then press Enter.
Of course, you can press the Windows key to select the Taskbar and then the Context menu key (between the Windows key and the Ctrl key on the right side of the keyboard) to display context menus.
Windows system key combinations
F1: Help
CTRL+ESC: Open Start menu
ALT+TAB: Switch between open programs
ALT+F4: Quit program
SHIFT+DELETE: Delete item permanently
Windows program key combinations
CTRL+C: Copy
CTRL+X: Cut
CTRL+V: Paste
CTRL+Z: Undo
CTRL+B: Bold
CTRL+U: Underline
CTRL+I: Italic
Mouse click/keyboard modifier combinations for shell objects
SHIFT+right click: Displays a shortcut menu containing alternative commands
SHIFT+double click: Runs the alternate default command (the second item on the menu)
ALT+double click: Displays properties
SHIFT+DELETE: Deletes an item immediately without placing it in the Recycle Bin
General keyboard-only commands
F1: Starts Windows Help
F10: Activates menu bar options
SHIFT+F10 Opens a shortcut menu for the selected item (this is the same as right-clicking an object
CTRL+ESC: Opens the Start menu (use the ARROW keys to select an item)
CTRL+ESC or ESC: Selects the Start button (press TAB to select the taskbar, or press SHIFT+F10 for a context menu)
ALT+DOWN ARROW: Opens a drop-down list box
ALT+TAB: Switch to another running program (hold down the ALT key and then press the TAB key to view the task-switching window)
SHIFT: Press and hold down the SHIFT key while you insert a CD-ROM to bypass the automatic-run feature
ALT+SPACE: Displays the main window's System menu (from the System menu, you can restore, move, resize, minimize, maximize, or close the window)
ALT+- (ALT+hyphen): Displays the Multiple Document Interface (MDI) child window's System menu (from the MDI child window's System menu, you can restore, move, resize, minimize, maximize, or close the child window)
CTRL+TAB: Switch to the next child window of a Multiple Document Interface (MDI) program
ALT+underlined letter in menu: Opens the menu
ALT+F4: Closes the current window
CTRL+F4: Closes the current Multiple Document Interface (MDI) window
ALT+F6: Switch between multiple windows in the same program (for example, when the Notepad Find dialog box is displayed, ALT+F6 switches between the Find dialog box and the main Notepad window)
Shell objects and general folder/Windows Explorer shortcuts
For a selected object:
F2: Rename object
F3: Find all files
CTRL+X: Cut
CTRL+C: Copy
CTRL+V: Paste
SHIFT+DELETE: Delete selection immediately, without moving the item to the Recycle Bin
ALT+ENTER: Open the properties for the selected object
To copy a file
Press and hold down the CTRL key while you drag the file to another folder.
To create a shortcut
Press and hold down CTRL+SHIFT while you drag a file to the desktop or a folder.
General folder/shortcut control
F4: Selects the Go To A Different Folder box and moves down the entries in the box (if the toolbar is active in Windows Explorer)
F5: Refreshes the current window.
F6: Moves among panes in Windows Explorer
CTRL+G: Opens the Go To Folder tool (in Windows 95 Windows Explorer only)
CTRL+Z: Undo the last command
CTRL+A: Select all the items in the current window
BACKSPACE: Switch to the parent folder
SHIFT+click+Close button: For folders, close the current folder plus all parent folders
Windows Explorer tree control
Numeric Keypad *: Expands everything under the current selection
Numeric Keypad +: Expands the current selection
Numeric Keypad -: Collapses the current selection.
RIGHT ARROW: Expands the current selection if it is not expanded, otherwise goes to the first child
LEFT ARROW: Collapses the current selection if it is expanded, otherwise goes to the parent
Properties control
CTRL+TAB/CTRL+SHIFT+TAB: Move through the property tabs
Accessibility shortcuts
Press SHIFT five times: Toggles StickyKeys on and off
Press down and hold the right SHIFT key for eight seconds: Toggles FilterKeys on and off
Press down and hold the NUM LOCK key for five seconds: Toggles ToggleKeys on and off
Left ALT+left SHIFT+NUM LOCK: Toggles MouseKeys on and off
Left ALT+left SHIFT+PRINT SCREEN: Toggles high contrast on and off
Microsoft Natural Keyboard keys
Windows Logo: Start menu
Windows Logo+R: Run dialog box
Windows Logo+M: Minimize all
SHIFT+Windows Logo+M: Undo minimize all
Windows Logo+F1: Help
Windows Logo+E: Windows Explorer
Windows Logo+F: Find files or folders
Windows Logo+D: Minimizes all open windows and displays the desktop
CTRL+Windows Logo+F: Find computer
CTRL+Windows Logo+TAB: Moves focus from Start, to the Quick Launch toolbar, to the system tray (use RIGHT ARROW or LEFT ARROW to move focus to items on the Quick Launch toolbar and the system tray)
Windows Logo+TAB: Cycle through taskbar buttons
Windows Logo+Break: System Properties dialog box
Application key: Displays a shortcut menu for the selected item
Microsoft Natural Keyboard with IntelliType software installed
Windows Logo+L: Log off Windows
Windows Logo+P: Starts Print Manager
Windows Logo+C: Opens Control Panel
Windows Logo+V: Starts Clipboard
Windows Logo+K: Opens Keyboard Properties dialog box
Windows Logo+I: Opens Mouse Properties dialog box
Windows Logo+A: Starts Accessibility Options (if installed)
Windows Logo+SPACEBAR: Displays the list of Microsoft IntelliType shortcut keys
Windows Logo+S: Toggles CAPS LOCK on and off
Dialog box keyboard commands
TAB: Move to the next control in the dialog box
SHIFT+TAB: Move to the previous control in the dialog box
SPACEBAR: If the current control is a button, this clicks the button. If the current control is a check box, this toggles the check box. If the current control is an option, this selects the option.
ENTER: Equivalent to clicking the selected button (the button with the outline)
ESC: Equivalent to clicking the Cancel button
ALT+underlined letter in dialog box item: Move to the corresponding item
Starting diagnostics from the boot CD
Starting diagnostics from the boot CD keeps the operating system out of the picture. What you’re really starting is the specialized setup program, and it doesn’t affect your system in any significant way. Your system must provide the means to boot from a CD. Fortunately, most modern systems provide this capability and you shouldn’t experience any problems. The following steps get you started using this technique:
1. Place the boot CD in the CD drive and restart the system.
2. Press Enter when you see the message to boot from a CD or DVD.
The setup program tells you that it’s installing some device drivers and other software. The drivers and other software represent the minimum required to interact with your system. For example, the setup program may have to install a driver to access the hard drive. When the initialization completes, you see the Install Windows dialog box, shown in Figure

3. Select the appropriate options in the Language to Install, Time and Currency Format, and Keyboard or Input Method fields. Click Next.
The setup program displays a different set of options. The main option shown in Figure is Install Now, but you don’t want to install the operating system at this point. What you want to do is access the diagnostic programs. Look at the options in the lower-left corner of Next Figure

4. Click Repair Your Computer.
You see a System Recovery Options dialog box.
5. Select the partition that contains the copy of Windows you want to manage.
6. Click Load Drivers, if necessary, to load the drivers for your hard drive. Place the disk containing the required drivers in the disk drive and click OK.
You should need to perform this step only for older devices, such as Small Computer System Interface (SCSI) drives. Follow the vendor instructions to load the driver.
7. Click Next.
You see a System Recovery Options dialog box containing three diagnostic options, as shown in Figure Noe you can do the Performing a Memory Test using Windows Memory Diagnostic Tool option.When you finish performing diagnostics, click Restart or Shutdown. The Shutdown option actually turns your system off unless it lacks the required functionality. The Restart option always restarts the system. Make sure you don’t press Enter when you see the Boot from CD or DVD message when you want to start the system normally.

Starting diagnostics from the boot menu
Starting diagnostics from the boot menu is considerably simpler than starting them from the boot CD. In this case, you want to start your system normally. However, when you see the boot menu, press F8 to display the Advanced Boot Options menu. The “Using a Special Boot Mode” section of this chapter describes all these options. You may want to start the memory diagnostic rather than use an advanced boot option. In this case, press Tab to access the Tools menu. The only selection in the current version of Windows is Windows Memory Diagnostic. Press Enter to choose this option. The “Performing a Memory Test” section of this chapter describes this option in detail.
Defining the Benefits of Windows Server Manager
Defining the Benefits of Windows Server Manager

Considering Windows PowerShell

The main purpose of Windows Server Manager is to help administrators install, configure, and manage server roles and features. A server role is a major part of the server, such as Active Directory support. A server feature is a lessinclusive part of the server that supports a server role, such as Failover Clustering. You can also use this utility to perform diagnostics and configuration and to manage storage, as shown in Figure 1-5. In many respects, Server Manager is a version of Computer Management (found in client Windows systems) for the server. You can also perform tasks with Server Manager at the command line. The ServerMgrCmd utility provides access to all the Server Manager functionality. You can use this utility to automate most server configuration tasks.
Considering Windows PowerShell
Windows Power Shell is a new kind of command prompt based on .NET technology. If you worked with the Windows command prompt in the past, you already have a very good idea of how to use Windows PowerShell because they both fulfill some of the same purposes. Of course, the two text environments aren’t precisely the same — Windows PowerShell overcomes some of the problems of the old command prompt by adding additional security and significantly enhancing your ability to create both batch files and scripts. One of the features you’ll like best about Windows PowerShell is the Help system Anything you can do with the .NET Framework, you can also do with Windows PowerShell
Communicating with Terminal Services (TS)
Terminal Services (TS) is an essential part of any server setup because it’s part of the software that lets you work from a remote location. Given that many people don’t like to work in the same closet that holds the server (it’s dark and stuffy in there), TS is an incredibly important application. Windows Server 2008 improves on TS considerably. Microsoft’s goal seems to be to provide remote access to applications and data in a way that makes it unnecessary to provide these features on the client in many cases. It’s a nod to the centrally managed mainframe computer of days gone by. The following sections provide a brief description of the special TS features for Windows Server 2008.
TS Easy Print
TS Gateway
TS RemoteApp
Communicating with Terminal Services (TS)
Terminal Services (TS) is an essential part of any server setup because it’s part of the software that lets you work from a remote location. Given that many people don’t like to work in the same closet that holds the server (it’s dark and stuffy in there), TS is an incredibly important application. Windows Server 2008 improves on TS considerably. Microsoft’s goal seems to be to provide remote access to applications and data in a way that makes it unnecessary to provide these features on the client in many cases. It’s a nod to the centrally managed mainframe computer of days gone by. The following sections provide a brief description of the special TS features for Windows Server 2008.
TS Easy Print
Most users need to print their data at some point. In the past, many printing solutions let the user print locally or remotely, but not both. TS Easy Print lets the user print the data from the TS RemoteApp application either locally or remotely. The server doesn’t even have to have the printer driver installed as long as the printer driver is installed on the client machine. Group policies help administrators control which printers users can access and how they can use them.
TS Gateway
Users can still rely on the Remote Desktop application to create a connection to the server. The Remove Desktop application must support Remote Desktop Connection (RDC) 6.0 to receive full functionality, but otherwise the user doesn’t notice any difference between Windows Server 2008 and any previous version of Windows.
TS RemoteApp
The TS RemoteApp feature makes it possible for the user to interact with TS without really knowing it. The user can start an application, as always, by double-clicking an icon or selecting an option on the Start menu. Of course, the user will see a delay in starting the application because a network can’t react as fast as the local machine can, but the application otherwise will run as normal. As with a locally installed application, the user can also start a remote application by double-clicking an associated file.
Considering the Windows Server 2008 Editions
Considering the Windows Server 2008 Editions
Windows Server 2008 comes in a number of versions and a number of editions. A version affects functionality in some way. For example, if your server requires a 32-bit operating system, you use the 32-bit version of the product. Likewise, anyone with an Itanium processor will require the Itanium version of the product. Windows Server 2008 breaks with tradition in that it also offers a Server Core version.
This new lightweight version is Windows without the windows; you can read more about it in the “Understanding Windows Server 2008 Server Core” section of this chapter. The Server Core version comes in Standard, Enterprise, and Datacenter editions. You can’t get Server Core in the Web or Storage Server editions because these editions require the use of a graphical interface and Server Core doesn’t provide the required support.
The Itanium Processor version is specifically designed to run on the Itanium processor. Except for not supporting a 32-bit version (because this processor doesn’t come in a 32-bit format), the features of the Itanium Processor version are much like those found in the Enterprise edition.
An edition defines the feature set of a particular version of the operating system. The Standard edition offers a different feature set from the Enterprise edition. You can get both editions in 32-bit versions. Consequently, you need to know which version and which edition you want before you purchase Windows Server 2008.
Although figuring out which version you want is relatively easy because you already know about your hardware, figuring out the edition is a lot harder because you have to consider features that you may not know about. The following sections describe each of the editions that Microsoft is offering for Windows Server 2008.
Memory considerations
The edition you choose determines how much memory the server will support. Sometimes, the memory limits aren’t a problem. If you have a small company with basic needs, you’ll never exceed the limits of even the 32-bit version of the Standard edition. However, if you’re working in a large enterprise and your server is part of a server farm, you’ll probably need something more robust than the Standard edition. Table 1-1 provides you with the memory limitations for various editions of Windows Server 2008.
Table 1-1 Memory Limits for the Windows Server 2008 Editions

Other hardware considerations
You’re going to need a relatively large hard drive for Windows Server 2008. Even though Microsoft says that you can get by with a 10 GB hard drive, that’s hardly realistic. Even the 40 GB hard drive that Microsoft Recommends is quite small for a Windows Server 2008 setup. A real setup is going to have as much hard drive space as you can afford. Because hard drives are inexpensive today, you should consider getting a 500 GB or larger hard drive and make sure to include a Redundant Array of Inexpensive Disks 1+0 or 0+1 setup in your plans, for reliability reasons.
You can read more about the various RAID levels at http://en.wikipedia.org/wiki/Standard_RAID_levels,In addition to having hard drive support, you must have a Video Graphics Array (VGA) display adapter (or better) capable of at least 800 x 600 resolution. It’s important to remember that this is a server, not a workstation. In many cases,you won’t need a super-high-resolution display adapter and monitor for a server. In fact, in some cases, it’s detrimental to provide too much screen real estate because moving all those bits around will simply consume processing cycles you could use for some other task.
You normally need a mouse too when working with Windows Server 2008. It’s possible to get by without a mouse by using hardware shortcuts, but you may find that some tasks become difficult when you go this route. As with the display adapter, you don’t need a fancy mouse to work with the server. 24 Considering the Windows Server 2008 Editions
Standard
The Standard edition provides functionality that the average work center, small business, or even medium-size business requires.. The main limitations for the Standard edition are the number of processors (up to four processors in a single server) and the amount of memory you can use. (See the “Memory considerations” section of this Post for details.)
Enterprise
The Enterprise edition provides functionality that a medium-size business will normally require for a centralized server. You also find this edition in larger businesses as part of a large workgroup. In addition to all the functionality that the Standard edition provides, the Enterprise edition also provides greater memory support and the ability to use more processors (up to eight processors in a single server). Additional features include clustering and hot-add memory support.
Datacenter
The Datacenter edition provides support for large businesses as part of the centralized server setup. It provides the maximum processor (up to 64 processors in a single server) and memory support allowed by Windows Server 2008. You receive, in addition to the features found in the Enterprise edition, improved clustering support and the ability to dynamically partition hardware. Additional features include hot-replace memory and hot add/ replace processor support.
Web
The Web edition is a special Windows Server 2008 setup for the sole purpose of supporting Web sites. Consequently, you won’t find many of the features found in other editions in the Web edition. This edition focuses on .NET Framework, IIS 7, and ASP.NET support. The reason you want to get this edition for Web sites is that it uses resources more efficiently and helps you support Web sites with fewer resources. In addition, having fewer features translates into a more reliable and secure server because there are fewer ways in which the server can fail. The memory and processor limits for the Web edition are the same as for the Standard edition. You can’t use the Web edition to create virtualized images.
New Features in Windows Server 2008
Network access protection (NAP) and enforcement
Every time other people access your network, they interact with it in ways that could cause contamination on their systems to also appear on your server. For example, if a laptop user gets a virus, your server will very likely get the virus too, unless you have a number of safeguards in place. Of course, most organizations today have all kinds of spam, virus, and other types of protection in place, even for internal contacts. The problem remains one of unhealthy clients — clients who lack the required updates or have some other fault that makes them a risky connection.
Network Access Protection (NAP).
NAP provides the means to check the health of any client connecting to your
network. When NAP detects an unhealthy client, it can act by limiting access until the client receives the necessary updates and configuration changes. In addition, you can specify a means of fixing the client to place it in a healthy state again. The bottom line is that your system gains another layer of protection from outside influences.
New printer and storage options
Microsoft has provided a number of new printer and storage options in Windows Server 2008. Most of these features fall into the required upgrade category. For example, Microsoft really needed to provide a means to access devices from the Web, so it provided a means to do that. Administrators have complained for years about the management tools in Windows, so Microsoft has also addressed that requirement. The following list provides some details on these new features:
✦ XML Paper Specification (XPS) Document Support:
XPS is a new open document format that Microsoft is promoting. It relies on XML to store document data so that you can theoretically retrieve the data even if the application used to create it no longer exists.
✦ New print paths:
A print path defines the software and actions that the operating system uses to process a document and send printer-ready data to the printer for output. In the past, the only print path relies on the Graphics Device Interface (GDI) originally found in Windows 3.x (albeit modified with each version of Windows). Microsoft now provides the XPS Driver (XPSDrv) software to process XPS documents more efficiently than ever. This new print path includes a host of features, such as direct support for transparencies, but you have to have the WPF installed to get it . You find a number of other useful additions to Windows
Server 2008 in support of the XPS specification.
✦ New printer driver model:
XPSDrv software represents a new way of outputting data. However, it also supports older output methodologies using the new print path. Even though XPSDrv software provides support for newer technologies, such as WPF, you can still use the driver without the .NET software. Of course, you won’t get any of the new features, but you will gain the performance benefits.
✦ Scalability improvements:
Normally, when a client makes a print request, the server performs all the required processing. Of course, placing the burden on the server reduces overall performance of the system for a very small gain in network performance. Windows Server 2008 now places the burden of printing on the client.
✦ Web Services on Devices (WSD):
This new feature relies on a common framework to describe and manage network devices. The concept is the same as a Web service, where you can query the device for specific information by sending it an XML request. Because this technology hides the details of working with the device, it greatly simplifies device interaction and reduces the potential for error.
✦ Improved print server management tools:
Anyone who has used Windows 2003 R2 has to appreciate the Print Management Console (PMC). Microsoft has improved this tool in Windows Server 2008. For example, you can now use PMC to migrate a printer from Windows 2000 or Windows 2003 to Windows Server 2008. The suite of tools also includes an improved Printer Installation Wizard that reduces the number of steps that an administrator must perform to detect and install a printer. As you can see from the list, Microsoft has provided some necessary and some nice-to-have printer and storage features in Windows Server 2008. It’s important to note that you still have to work pretty hard to obtain drivers for some hardware, but at least the support will be there after you find the drivers.
Read-only domain controller (RODC)
Even though you consider your domain controller safe from external influences, someone could potentially break into it and make changes to your setup. In addition, errant applications can cause havoc to your system. These are just two of the reasons for having a read-only domain controller (RODC).
Using an RODC makes Active Directory a read-only environment, which means that any changes that anyone makes are automatically overwritten with the original data. No changes occur to the server unless you make them. The main reason to use an RODC is that you can’t guarantee the physical security of the domain controller or have other concerns about the maintenance of server data.
For example, the RODC could appear in a branch office where a less-skilled administrator performs application installation or other tasks. In most cases, this less-skilled administrator won’t have access to any other server and won’t appear as part of the Domain Administrators group. Don’t worry that an RODC automatically becomes outdated either.
Unlike with a writeable domain controller, you can’t make changes directly to Active Directory, but the server can make requests for data from a writeable domain controller. For example, when a user tries to authenticate against thedomain controller the first time, the RODC sends the authentication request to a writeable domain controller.
If the authentication is successful, the RODC can request a copy of the credentials from the writeable domain controller and store them locally. Using an RODC improves security by making it impossible to write data to the local copy of Active Directory. However, it also provides benefits to the branch office. A special feature allows non administrators to gain a temporary increase in privileges to install applications and perform some limited management tasks so that an administrator doesn’t have to continually run to the branch office. In addition, because the RODC provides a local cache of Active Directory data, users will notice a performance increase because the network doesn’t continually experience the latency issues found in a standard
wide area network (WAN).
Windows Deployment Services Microsoft wants to make it easier for you to get its product on your machine, and Windows Deployment Services (WDS) is another in a long line of features designed to make that happen. The theory is that you use this new service to deploy Windows over a network on systems that have no operating systems installed. This feature originally appeared in Windows Server 2003 as a separate install, but you get it as part of Windows Server 2008. One especially nice addition is that you can perform the deployment without being physically present at the remote machine. You also find these features included with the new WDS in Windows Server 2008:
Enhanced Trivial File Transfer Protocol (TFTP) performance:
Windows Deployment Services relies on TFTP to download network boot programs and the Windows Pre-installation Environment (PE) images to the client.TFTP now includes a configurable windowing mechanism that reduces the number of packets that clients send, improving performance.
Diagnostics:
Windows Deployment Services now provides a considerable amount of information about the client install in the form of Crimson logs. You can use any Crimson-compatible product, such as Microsoft Office InfoPath, to process the logs and perform data mining on them.
Multicast deployment:
Using a multicast deployment technique lets the server install Windows on more than one client at a time using the same transmission thread. This approach improves overall performance and makes it possible to update the clients quickly. You have a choice between ScheduledCast (a task-based deployment where the client must join the session before the start of the download) or AutoCast (available at any time) deployment. Windows Server 2008 provides monitoring so that you can see how much of the multicast deployment the individual clients have received.
Internet Protocol version 6 (IPv6)
The world is running out of Internet Protocol (IP) addresses because every device seems to require one these days. When IP version 4 (IPv4) originally appeared on the scene with 4,294,967,296 possible address combinations, the standards groups thought that no one could ever use that many addresses. Unfortunately, the standards groups were wrong, and we now need IPv6, which provides a significantly larger address space of 3.4028236692093846346337460743177e+38 possible addresses. Of course, the standards groups also took this opportunity to improve performance, add support for mobile devices, and make IP more secure.
Just because Windows Server 2008 supports IPv6 doesn’t mean that everyone supports it. Before you can gain the benefits of IPv6 on your own network, you need to update older machines to use it. Microsoft has no plans to support IPv6 on Windows 2000 or Windows 98 machines, as outlined in the FAQ at http://www.microsoft.com/technet/network/ipv6/ipv6faq.mspx. The same FAQ tells you how to install IPv6 support for Windows XP and Windows 2003. Fortunately, both Vista and Windows Server 2008 include IPv6 as part of their default configurations. Adding IPv6 to your own network won’t do anything for external connections. To gain the full benefits of IPv6, you must also encourage your Internet service provider (ISP) to upgrade, which may be more difficult than you think. At some point, you can expect IPv6 to become a reality across the Internet, but the wait may be a long one.
.NET Framework 3.0
The .NET Framework is now part of Windows when you install it. The main reason for this change from previous versions is that Microsoft is using the .NET Framework more and more within Windows applications. For example, you’ll find that the Internet Information Services (IIS) Manager relies on the .NET Framework. In fact, you may very well find that many parts of Windows Server 2008 rely on the .NET Framework, which means that you have to get used to some new rules for setting security. The .NET Framework 3.0 isn’t much different from the .NET Framework 2.0 in many respects — at least, not in ways that you’d notice immediately. The main difference is that this new version of the .NET Framework provides access to some new features that Microsoft includes in both Vista and Windows Server 2008. These features appear as part of new foundations that Microsoft provides for making development easier, as shown in the following list
✦ Windows Presentation Foundation (WPF): Lets you create interesting graphics displays. In general, this feature applies only to client machines because it provides access to features such as the Aero Glass display in Vista. A server developer could possibly use this feature to provide graphs, charts, and other graphical elements in an application, but it’s unlikely.
✦ Windows Communication Foundation (WCF): Provides access to Web services. A Web service is a special kind of external connection to resources on another machine. For example, an application on your server could request a database update from another server through a Web service. In most cases, you won’t even know that the application is using a Web service to perform its work, because everything happens in the background.
✦ Windows Workflow Foundation (WF): Provides a means of creating an application that relies on a workflow to perform a long-running task. Workflow is a new marketing term from Microsoft that essentially means performing a task using a specific process. Using this feature, a developer can create an application where activities must proceed in a specific order based on various conditions, such as the successful completion of another
activity. Using workflows tends to reduce human error, which is the entire point of using this functionality.
✦ Windows CardSpace: Maintains user digital identity information in a secure environment that provides an ease of use equal to working with identity or credit cards. These virtual identity cards make it easier to gain access to resources online. In addition, because the user doesn’t actually have to remember much, the digital identity can rely on complex passwords and other means of identifying the user to the server. Generally speaking, all the existing .NET applications you have will run just fine under Windows Server 2008. About the only time you notice a change is if the application requires a new .NET Framework 3.0. In most cases, these changes appear only under the new operating systems.
Internet Information Server (IIS) 7
Internet Information Server (IIS) 7 is so completely different from what has gone in the past that you probably won’t recognize it. The interface is different, the configuration is different, and the internal workings are different. The reason for the massive change is that the old IIS just wasn’t keeping up with the latest Web technologies. In addition, at least some of the problems that administrators experience with IIS are due to the older design.
The biggest difference you’ll find in IIS 7 is that it places a new emphasis on administrators working with developers to create a Web solution. You can now configure ASP.NET applications in ways that you could only imagine in the past. Developers can also include new settings in applications to make the applications more responsive to enterprise needs.
Microsoft has also placed an emphasis on .NET development in IIS 7. Yes, you can still provide static content, and most scripted applications will work as well as they did before.The result is that your ASP.NET applications will perform better than ever.
 IIS 7 includes a wealth of other changes that you’ll find make your job easier. For example, all the configuration files are now based on XML instead of relying on an arcane database that’s prone to corruption and other problems. You can configure IIS easily from the command prompt, from within the Internet Information Services (IIS) Manager, or by using a simple text editor to change the files directly.
Federated rights management
Active Directory Federation Services (AD FS)
Rights Management Services (AD RMS).
A second Windows Server 2008 role is Active Directory Rights Management Services (AD RMS). This service provides the means to attach usage rights to the data on your server. The rights to that data remain persistent no matter where someone moves it. You would use this feature to provide security for sensitive documents, such as financial reports.
The combination of ADFS and ADRMS form the Federated Rights Management feature. The use of these two server roles together provides a package of persistent, secure data management.
Improved failover clustering
Windows Server 2008 includes a number of new roles, one of which is Active Directory Federation Services (AD FS). This feature lets an administrator define an access identity across a network even if the access occurs over the Internet. In addition, this feature relies on the role-based security built into the .NET Framework.
Consequently, when someone logs in to the system, they have the rights defined by their role. A manager may have only manager rights when logging in from a local system — they may actually appear in the user role logging in from the Internet.
The AD FS role works across platforms, so it no longer matters if your network contains a mix of Windows, Linux, and Macintoshes. The administrator can also provide role-based authorization to Windows Share Point Services (WSS) and Rights Management Services (RMS) for a federated partner. A new Group Policy feature lets the administrator limit federation service deployment. It’s also possible to check on certificates by using the certificate-revocation checking settings.
Rights Management Services (AD RMS).
A second Windows Server 2008 role is Active Directory Rights Management Services (AD RMS). This service provides the means to attach usage rights to the data on your server. The rights to that data remain persistent no matter where someone moves it. You would use this feature to provide security for sensitive documents, such as financial reports.
The combination of ADFS and ADRMS form the Federated Rights Management feature. The use of these two server roles together provides a package of persistent, secure data management.
Improved failover clustering
Failover clustering is an important feature for a multi server network, where one server can take over for another when a failure occurs. Of course, you have to have the right hardware and software to create a clustered network, which means having knowledge of precisely what Windows is looking for in a cluster. Unfortunately, it was very difficult to make this determination in the past.
Microsoft has fixed this problem in Windows Server 2008 by providing validation tests you can use to ensure that your setup will work as a cluster. You now have access to node, network, and storage tests that determine whether a cluster will work and provide you with tips on resolving any potential issues.
After you determine that your hardware will work, you need to perform the setup. The new cluster software performs a configuration validation before it attempts to install the cluster. When the validation passes, the administrator can use a single-step setup process to install the cluster.
Daily maintenance is a requirement for any clustered setup. The new software provides easy methods for adding and removing clustered resources as needed. It’s also possible to perform management tasks from the command line (using standard cluster utilities) or with Windows Management Instrumentation (WMI). In fact, you can combine the two and use the command line WMIC tool to work with WMI at the command line.
The biggest improvement in failover cluster management is the way in which you can interact with hard drives. For example, you can now add a hard drive resource while the cluster is serving applications. The actual hard drive interactions are also improved. Microsoft has made changes that improve performance, such as not relying on SCSI hard drive resets. In addition, the software no longer leaves the hard drives in an unprotected state, which reduces the risk of corruption. You can even use a GUID Partition Table (GPT), as contrasted with the standard master boot record (MBT) partition, for increased hard drive space and reliability
The biggest improvement in failover cluster management is the way in which you can interact with hard drives. For example, you can now add a hard drive resource while the cluster is serving applications. The actual hard drive interactions are also improved. Microsoft has made changes that improve performance, such as not relying on SCSI hard drive resets. In addition, the software no longer leaves the hard drives in an unprotected state, which reduces the risk of corruption. You can even use a GUID Partition Table (GPT), as contrasted with the standard master boot record (MBT) partition, for increased hard drive space and reliability
An Overview of Windows Server 2008
Installation and Setup
Bit Locker drive encryption
Microsoft tries to improve each version of Windows Server. Most new versions offer improved reliability, performance, and security. Windows Server 2008 also includes a new version of Internet Information Server (IIS) that’s so different from what you used in the past that you might not even recognize it as the same product. In the new Windows Server 2008 Core Services, this is a Windows without windows. All you get is a command prompt with this version of Windows.
An Overview of Major New Features in Windows Server 2008 Bit Locker drive encryption
Bit Locker, a new feature in Vista, has also made its way into Windows Server 2008. This particular feature has the potential to improve system security immeasurably when it comes to tampering. Because Windows encrypts the entire hard drive, anyone attempting to read the hard drive outside the server won’t get very far. In addition, someone can’t even start the server without the required information because the hard drive encryption keeps the data completely locked (including the Windows boot code) until you provide the required code.
This feature makes a lot more sense on a laptop or other machine that leaves your premises regularly. Someone leaving a laptop sitting in a public location won’t then compromise all that precious data you worked so hard to accumu¬late. However, using BitLocker does mean that you don’t have to worry as much about someone gaining access to company data when you perform an upgrade of the hardware. Even if your assistant forgets to wipe the hard drive, no one can get to the data at the recycling center.
Enhanced Windows Firewall
Microsoft has been working hard to improve the security of Windows. The Windows Firewall in Windows Server 2008 is considerably easier to use than in previous versions of Windows, and it provides additional functionality. One method it’s employing is to make it harder for outsiders to gain entry to the server while making it easier for the network administrator to perform the required configuration. The initial display says it all by providing you with a quick indicator of firewall status , as shown in Bellow
 The new firewall makes it easy to detect its current status. Configuring the firewall is considerably easier than in the past.
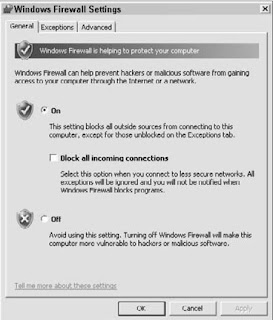
Understanding and Installing Cabling
Understanding Methods of Network Cabling
Network cabling is a method of connecting two or more computers so that they can communicate and share data, programs, and peripherals. Whether you’re cabling a small or a large network, you can use traditional cabling methods, which consist of various wiring and hardware techniques. With the continuing popularity of home networking, many manufacturers are producing networking kits that make cabling faster and easier. Additionally, techniques of using home phone lines and electrical housewiring (or power lines) are changing the scope of home networking altogether. Wireless connections are another popular option. Often various methods of networking cabling are combined.
The type of cabling you use in your network depends on a number of elements. You should consider network cost, the speed of the network connections, available resources, and so on. This Post and the next two explain the various methods you can use to connect your computers as a network.
Considering Networking Topologies and Technologies
You must lay certain foundations when building a network. In addition to choosing whether the network will be of the workgroup (or peer-to-peer) or client/server type, you should choose which topology and technology you will use for the network.
The topology of the network refers to how you arrange the cables, the networking hardware, and the computers. Technology refers to the type of wiring and hardware you use and to the general speed of the network. Network speed refers to how fast the data is transferred between two or more computers.
Basically, four topologies are possible:
✦ Bus
✦ Spanning tree (or star)
✦ Ring
✦ Mesh
Understanding Cabling
The cabling is a fundamental part of networking. Cabling provides the physical connection between computers; cabling is used for transmitting and receiving information over the network. You can connect your network with any of various types of cabling, or wires.
CAT 5 is the best cable for any network—business or home. CAT 5 works equally well with 10Base-T or with 100Base-T. You might want to start your network with CAT 5 cabling and 10Base-T hardware—10 Mbps network cards and hub—and then when you’re ready, upgrade to 100Base-T hardware. 100Base provides transfer rates of 100 Mbps.
Using twisted-pair cable connectors
Twisted-pair cabling uses different connectors than coaxial cabling uses. In twisted-pair, you use one connector to plug into the network card or hub. You can use a second connector to plug into a wall panel, called a jack, or patch panel to help keep the cables safe from kinking and to look nicer in your home
Teaching the use of the network
Teaching the use of the network
Before you can expect everyone to use the network without any problems, you’ll have to teach them the finer points of network usage. You may want to sit down with the entire family or go over it with each individual. It’s a good policy to show the adults in the house how to use the network first, and then let them help you teach the kids.
You don’t have to teach everyone the intricacies of the network; you just need to show them how to get what they need and go where they must go. The less you tell kids, as a matter of fact, the better off you’ll be in the beginning. As teenagers work with the network more and more, you can begin to show them the details of how it works.
Consider the following issues to teach the kids:
✦ Browsing the network
✦ Directory structures
✦ Opening folders on other computers
✦ Copying folders and files from others’ computers
✦ Creating folders on others’ computers
✦ Backing up to a specific drive or folder
✦ Finding the printer or other peripherals
✦ Choosing the default printer (if you have more than one printer)
Server types
Server types
If a network uses only one server, the server provides all services to the clients. Some services include file storage, application management, printer and other peripheral management, backup and restoration services, Internet access, and so on. If not many clients are attached to the network and the server is a powerful machine, one server can easily provide all of these services.
src="http://pagead2.googlesyndication.com/pagead/show_ads.js">
If, however, many clients are on a network and they all need a variety of services, it’s often a good idea to add one or more additional servers. With a second, third, and fourth server added, network efficiency improves. In a home, you’re not likely to need more than one server; in a business environment, however, using multiple servers may be necessary. You can use one server, for example, as a file and print server, and another as a backup server, Web server, database server, or other type of server, depending on the type of business you run and the amount and type of information you use in that business.
When more servers are added to a network, each server usually specializes in certain jobs to help improve productivity. For example, one server might contain all the data files and folders for all clients, one server might provide e-mail and Internet access, and another server might furnish shared applications.
Security
One of the most important services a server provides is authentication, or checking to make sure that a user has permission to access the network. In a small network, one server might perform authentication and other services. In a larger network with multiple servers, an authentication server might perform the job. Similar to Windows checking your username and password, an authentication server does not allow a user access to the network unless he or she types in the exact information called for and that information appears in the server’s master list. The list contains usernames, passwords, and user account information.
User account information includes a list of permissions, or rights, for a specific user on the network. These rights specify whether the user can access certain files, folders, and services. If a user wants to print, for example, the client computer sends a request to the server, which then either accepts or denies the request according to that user’s permissions. If the server accepts the request, the print job is then sent to the appropriate printer. The network administrator sets the rights and permissions for each user of the network.
Using a client/server network
A client/server network is different from a workgroup network in that only one computer called the server shares its resources with all other computers called clients. The computers in a workgroup network could also be called clients; a client is a device that makes use of the available services. In a client/server network, the clients only use the server’s services.
A server generally stores all data files, many applications, and control over peripherals and resources. Some networks contain one server, and others may contain multiple servers. The number of servers depends on the number of clients and the number of services offered.
The server controls all files, folders, printers, and other resources. The client computers must request a service and be approved before they can access a resource. Note that cables connect all devices to a small box, called a hub. Most networks need a hub to help modify transmission signals, and to extend the network past two workstations.
A client/server network, depending on the hardware, services offered, and the network operating system, can serve anywhere from 10 to 150 or so clients. As in a workgroup network, the more clients attached to the network, the busier the network traffic and perhaps the slower the transmissions. Some larger networks have multiple servers to provide a wide variety of services to the clients.

Understanding Network Types
There are two types of networks from which you can choose for your home network: client/server or workgroup. The type you choose depends on your networking goals, the equipment you want to install, your experience level, and the time you plan to invest. Each method of networking provides distinct advantages and disadvantages. If this is your first network or if you want only a small and simple network, you will most likely set up a workgroup network to start.
A workgroup network is simpler to operate and less expensive than a client/server network. After you gain experience, however, you may want to switch over to a client/server network, using your workgroup setup as a foundation.
Workgroup networking is the most simple and inexpensive network to set up. Network administration is easy, as well, with workgroup networking. Client/server networking, the alternative to workgroup networking, creates more work, more expense, and more administration time. Using a workgroup network In a workgroup network, all computers share their resources—including files, folders, drives, printers, and so on—with all others on the network. Each PC still runs its own local applications and programs.
A workgroup network usually contains from two to ten computers cabled together. You could possibly include more than ten computers, with the right hardware and software; however, when you have more than ten computers on a workgroup network, you slow down the performance of every computer on the network, as well as limit network speed, security, and efficiency. You can use devices, such as routers and switches, to connect more than ten computers efficiently; however, remember that the more computers on your network, the more management, time, and money it will involve.
 This figure illustrates one example of a workgroup network. Although these computers appear to be beside each other, each one could be located in a different room in a house. The Windows computers, the notebook computer, and the laser printer are all connected; the computers share all resources equally
Understanding Network
Understanding Network Basics
All networks use some basic hardware and software, but different configurations of this equipment define the type and uses of the network. For example, you may want to network two computers in the same room. The equipment you use to achieve this network can be different from the hardware you use to network two computers in different rooms or even in different buildings. Similarly, the hardware you use to enable two computers to use one Internet connection is different than the software you use for two computers sharing a printer.
Understanding network uses and network types helps you plan your network. Because networking your home or office is often involved and time consuming, you need to understand the advantages and disadvantages of networking before planning your network. Understanding the pros and cons of networking helps you plan the exact network that’s right for you and your family. In addition, before you can plan your network, buy the hardware and software, and teach your family to use your network, you need to understand some basic networking terms and technologies.
Introducing network equipment
A network includes two or more computers. Those computers may be desktop PCs, but they can also be notebooks or laptops, handheld computers, Macintoshes, Linux boxes, or others. The products, configuration, and steps described hear target the Windows 98 and Windows XP operating systems; however, Macintoshes and Linux boxes are also discussed. The network equipment is similar for any type of operating system you use.
Networked computers are attached to each other with cables or wires, and it is across those wires that the shared information passes. There are also some wireless methods of attaching computers, such as with radio frequencies or infrared.
Some cabling methods better suit an office than a home, depending on the number of computers, network type, and office space. You’ll likely want to use more traditional cabling for a small-business office. There are even some alternatives to traditional cabling for your home network.
Summary
In this post, we’ve learned about what it takes to build a network and about how this Blog can help you with many different networking problems. Specifically, you learned about the following:
✦ Building a workgroup network
✦ Building a client/server network
In the next Post and further, we learn the fundamentals of networking, such as the advantages and disadvantages of networking, the definition of a network, and how to get your family ready for a network.
✦ Building a workgroup network
✦ Building a client/server network
In the next Post and further, we learn the fundamentals of networking, such as the advantages and disadvantages of networking, the definition of a network, and how to get your family ready for a network.
Network Cable And Software
Network cabling
You have no idea what networking cabling is available or what it means. Network speed depends on the type of cabling and hardware you use, but you’re not sure what network speed is or how much you’ll need.You have Ethernet 10/100 network cards already installed in your computers. You need to know what type of cable you can use with these cards, what the difference between 10 and 100 is, and if there’s any other hardware you need to set up your computers.
Networking software
You want to connect to the Internet, so you want to know if you have to use the TCP/IP protocolon your network. This is a common misunderstanding. TCP/IP is the protocol of the Internet, but you can use a separate protocol for your network, even if you’re attaching to the Internet.In planning your network, you realize that everyone in the house uses a PC except for your youngest son. He uses an iMac. Is there any way you can attach his computer to the network, or will you have to purchase him a printer of his own? You can attach Macintoshes to a PC network and enable them to share printers and files by using special networking software.
Using the network
If you have already set up your network—installed cabling and hardware—but you’re having trouble getting computers to see each other or locate resources on the network, you can quickly find the help you need in this section. Consider these scenarios.
Connecting computers
Ever since you set up your network, you have one computer that just won’t see the other computers in the Network Neighborhood. You’ve tried everything you can think of, but you’re ready to throw the computer out the window.
You recently changed the network card on your computer and now you can’t get that computer to attach to the network. Is there anything you can try that you haven’t already? You might need to update or reinstall your adapter driver or reconfigure your protocol configuration.
Using network printers and other resources
Your printer is set up and ready to go; however, no one on the network can see the printer in his or her computer. You know there’s something else you must do, but you’re not sure what it is. You’ll want to make sure that you’ve installed the appropriate network printer driver in each computer. Only
Listing steps to add a server
Client/server networking is a setup in which files, applications, and resources are centralized on one high-speed, powerful computer called a server. Other computers, called clients, then attach to the server and use the resources as they need them. Client/server networks are faster than workgroup networks, and a server supports more clients, or users, than a workgroup network. For example, a client/server network may have from 10 to 2,000 users attached to a server.
If you choose to add a server to your network, you’ll need to do the following, in addition to the preceding set of steps:
1. Determine the type of network operating system you want to use.
2. Purchase a server and configure the server’s operating system by setting up user accounts and permissions, setting up rights on files and folders, setting up a print server, installing and configuring applications, setting up permissions, and so on.
3. Configure the clients to see and use the server, and perhaps create login scripts and other security measures.
4. Check all client/server connections.
If you’re creating your network for a small business, either in your home or in an office, you may want to use client/server networking instead of workgroup. There are certain advantages to the client/server configuration in a business network. In a client/server environment, the network is easy to expand to include more client computers, network operations in a larger group are faster, you can provide more services to everyone on the network, and security is tighter. Finding the Help You Need You may already be familiar with networking types. You may already have a network set up in your home. your network or want to learn about Transmission Control Protocol/Internet Protocol TCP/IP.
Planning your network
As you might know, you go through several stages to plan a network. You must decide what type of network you want, which speed to use, what kind of cabling and hardware is best for your situation, and so on. You’ll find all of the information you need to plan your network in PC-Hardware-Networking . Consider the following scenarios.
Budget considerations
You want a home network, but your budget is limited. You have only about $150 to spend on all of the equipment you need to connect two computers. You want to know if you really have to spend more money than this for such a simple task. Now, you can connect two computers for as little as $20. Additionally, you can use any number of kits to connect two computers now, and add computers later when you’re ready.
In contrast, say you’re building a home and you have no limit to the amount of money you spend on your network. In fact, you want to cable the home to perform more than just computer networking: You want to include climate and environment controls, security lights and cameras, and video and stereo equipment on your network.
Server issues
You’ve heard that the kid next door has a server in his basement, so you want a server too. However, you don’t want to use a server like the one at work or in larger offices, which uses the NetWare or NT Server operating system. You want something that’s simple to operate and maintain and easy for everyone to access for storing their files, printing, and so on. What do you do? Consider using a powerful computer with Windows XP as the operating system.
You want to back up all of your data to another computer, but you wonder if it has to be a server computer. Must a tape drive or Zip drive be connected to a server? Do you have to use a server’s software to back up files? You can back up files to any other computer on the network. You can also attach a tape, CD drive, or Zip drive to any computer on the network and save to those drives.
Subscribe to:
Posts (RSS)


